Navigate and inspect the Program viewer with tools and zoom, define a work area, choose live/cache playback, read scopes, and turn on safe-area guides.
Where: Native Video Editor → Program viewer and transport.
Key ideas
- The playhead is shared: Viewer, transport, Properties, timeline values, scopes, and 3D controls all evaluate the same active composition frame.
- Caching trades preparation for steadier playback: Live renders on demand; Cache start and Cache range prepare frames ahead or across the work area. Cache state and limits are reported beside the transport.
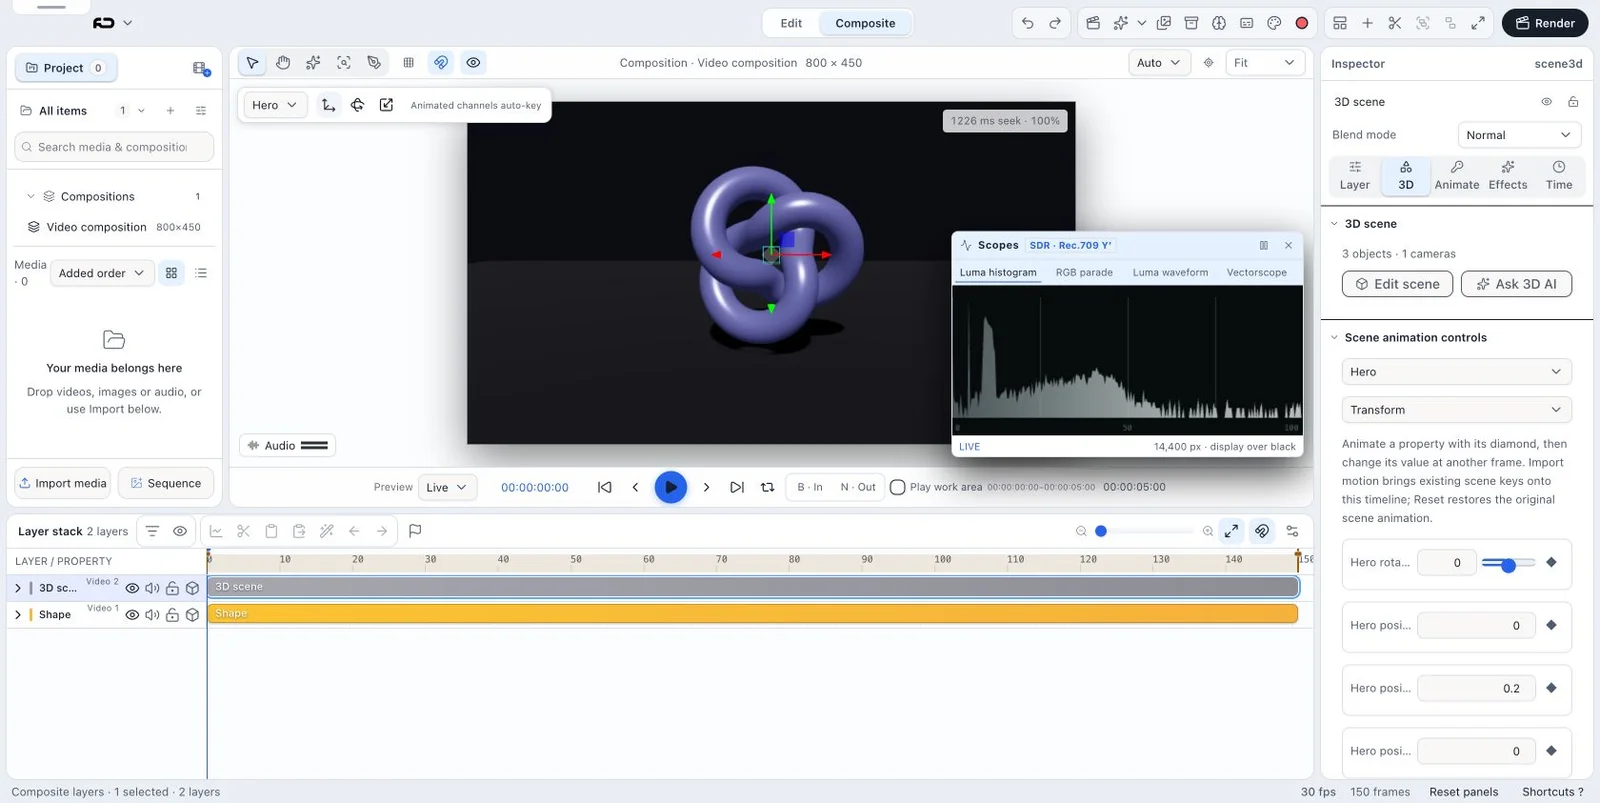
- Scopes measure the composited frame: Luma histogram, RGB parade, luma waveform, and Rec.709 vectorscope analyze displayed pixels. Hold freezes the current measurement; playback samples at a bounded live rate.
Steps
- Use Select for layers, Hand for panning, Rectangle/Pen for masks, or Track for drawing a footage-analysis region.
- Choose Fit & center or a zoom value. Hold Space and drag to pan without permanently changing the active tool.
- Use start/end, previous/next frame, Play/Pause, and the timecode to navigate. Toggle Loop when the chosen range should repeat.
- Press B and N or use the transport to set work-area In/Out, then enable Play work area when only that range should loop.
- Open the cache control and choose Live, Cache start, or Cache range. Wait for the status to show enough prepared frames before judging difficult motion.
- Open Scopes and select Luma histogram, RGB parade, Luma waveform, or Vectorscope. Use Hold when comparing a fixed frame.
- Open Guides and toggle Title/action safe, Center-cut safe (4:3), Frame center, Proportional grid (thirds), or Grid; use Hide all guides to clear the overlay.
- Maximize the viewer for inspection, then restore it before detailed timeline/property work.
- Review the final exported file at normal speed and with audio; cached canvas playback is an authoring preview.
- Open the gear beside Preview to configure memory and disk budgets for cached playback.
- Leave Memory on Auto first; set Disk cache to Auto for long ranges unless you have a reason to disable it or choose a manual quota.
- Choose Full resolution when cached frames must match composition size, or Fit to memory when you prefer a smaller RAM-only preview. Reset to Auto restores the recommended memory, disk, and quality choices.
- Use Preview Resolution to choose Auto, Full, ½, or ¼ when playback performance is an issue; Auto starts at full quality and adapts to observed playback load.
- Remember that Preview Resolution only affects interactive playback. Full-resolution export/render quality is controlled separately.
- Select one or more layers to show the transform box in the Viewer. With multiple layers selected, the box spans the selection and transforms every member while retaining each member’s relative pose.
- Drag an edge/corner handle to scale or the rotation ring to rotate. Alt/Option scales about the box center; Ctrl/Control mirrors the drag through the held edge; Shift inverts the aspect-lock behavior.
- Use the live pointer readout for delta, angle, or scale factors; release only after reviewing the full selection in the Viewer.
Preview cache budgets
- The Preview menu selects Live, Cache start, or Cache range; the adjacent gear opens Preview cache settings.
- Memory Auto uses a fraction of the memory reported by the desktop app or browser. Manual RAM sizes are limited by the machine’s reported ceiling.
- Disk cache can be Auto, Off, or a manual quota. Cached frames can be stored Lossless or Compact; Compact uses fewer bytes with a small quality cost.
- Full resolution renders cached frames at composition size and can use disk for overflow. Fit to memory renders smaller to stay in RAM.
- Settings apply immediately and persist. Reset to Auto restores automatic RAM, disk, and full-resolution choices.
- Disk cache is only for interactive preview. Final exports render from source media and the composition.
Preview resolution is not export resolution
- Auto begins at full quality and can scale down to keep playback responsive.
- Full displays the source at full preview resolution; ½ and ¼ trade viewer detail for performance.
- This setting is for the interactive preview and does not lower final export quality.
Direct transform gestures
- A multi-selection gets one shared box; scaling/rotation applies to the group while preserving each layer’s own pose.
- Alt/Option scales around the box center.
- Ctrl/Control mirrors the scale gesture through the held edge.
- Shift reverses the aspect-lock rule for that drag.
- A live delta/angle/scale readout appears near the pointer while dragging.
Object Selection tool
- Object Selection appears in the viewer tool family for a selected image/video source; use its separate guide for local WebGPU selection and Add/Apply mask behavior.
- The tool is unavailable in 3D-layer editing and does not use remote inference.
Guide shortcuts
- ' — Title / action safe
- Option/Alt+' — Proportional grid (thirds)
- Cmd/Ctrl+' — Grid
- Cmd/Ctrl+Shift+X — maximize/restore viewer
Scope readouts
- Luma and waveform use SDR Rec.709 Y′
- Vectorscope uses SDR Rec.709 CbCr
- Footer reports sampled pixels and Live/Hold state
- Scopes display the compositor output over black and require the frame renderer
Tips
- Use safe guides for delivery-critical text, not as hard crop boundaries.
- A scope explains signal distribution; it does not decide whether the creative grade is good.
Limitations and important notes
- Scopes are unavailable where the host cannot supply rendered frames.
- Playback cache is bounded by memory/runtime limits and may need rebuilding after edits.
- Still frames and scopes cannot validate motion cadence or audio sync.
Troubleshooting
Playback stutters during an effects-heavy section.
Set a work area around it, choose Cache range, wait for preparation, and replay. For acceptance, inspect an export.
Scopes do not open.
This host lacks the required frame renderer or the viewer has not produced a composited frame yet.